Feb 03, 2015
Another important step in finishing the Museum's He 219 Uhu (Owl) night fighter has been completed. Recently, the wing was painted and transported to the Steven F. Udvar-Hazy Center in Chantilly, Virginia, for the aircraft’s final assembly. The painting stage was no easy task, and it required a lot of careful research before the actual work began. The Paint Scheme of the Wing During World War II, the Luftwaffe (the German Air Force) standardized all its aircraft colors as registered by the Reich Aviation Ministry (RLM). Most Luftwaffe aircraft were delivered from the production line in standard RLM (camouflage) colors and patterns, which were, in many cases, promptly “field” modified by the ground crews at the field air bases, or at unit level.
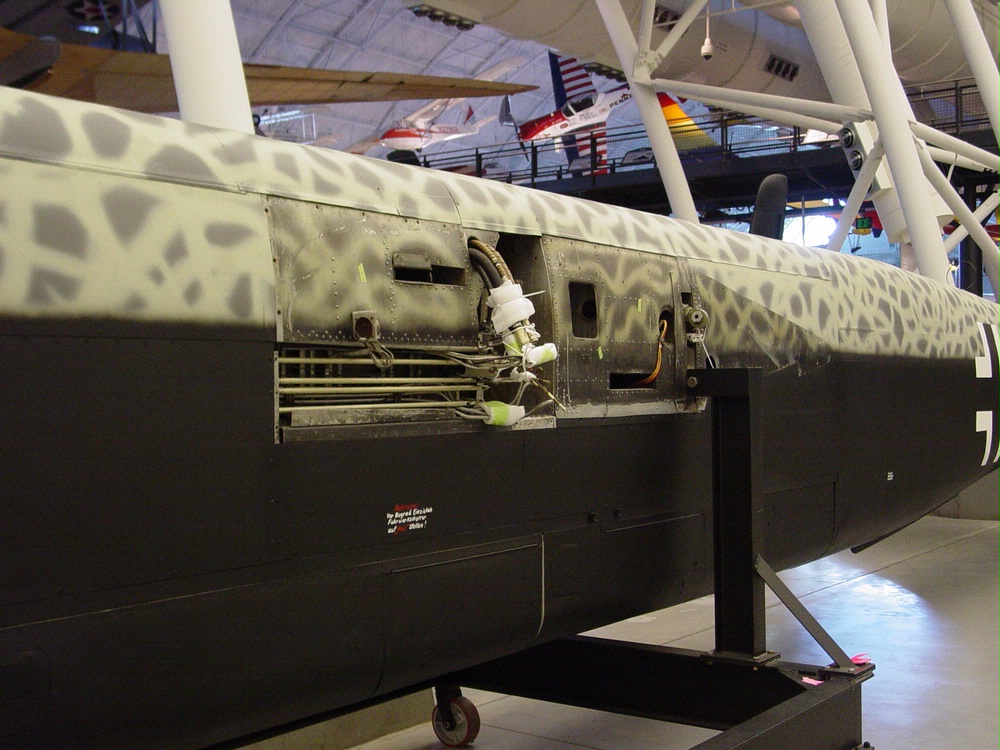 Under the wing root of the He 219, the original wave pattern (Wellenmuster) of the night fighter's camouflage paint was still clearly visible. Museum specialists used these traces for reference to recreate the wave pattern on the fuselage, and now the wing. Photo: Dave Wilson
He 219s were produced primarily in one of two color schemes. In both schemes, as per RLM regulation, upper surfaces were sprayed with a base color of RLM 75 Grauviolett (Gray Violet) and camouflage patterns subsequently applied in RLM 76 Lichtblau (Light Blue), or one of the late war variants ranging from “duck egg” blue to green. The difference in schemes shows in the treatment of the lower surfaces. Early models generally had undersurfaces painted in RLM 22 Schwarz (Black), while later models had the undersides painted in RLM 76 or one of the above- mentioned late war variants. The Museum’s aircraft may be unique in that it appears to fall in the transitional period between the two different schemes. All indications are that it left the factory with undersurfaces in black. At some point in its short career of less than a year, between July 1944 and May 1945, the undersurfaces were overpainted with the upper camouflage variant color, probably at the unit level.
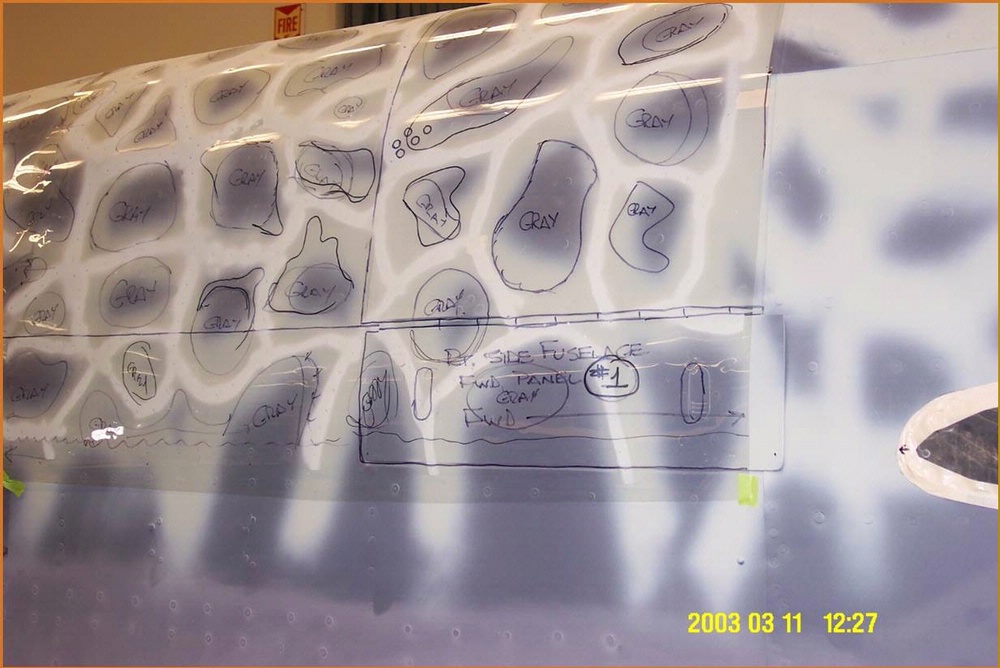 Mylar tracings of the original pattern are draped over the airframe to show how the pattern replicated by museum specialist Dave Wilson mirrors that of the original (shown here at the fuselage, just aft of the wing root). Photo: Ed Mautner
To find the perfect color match, museum specialist Dave Wilson compared the known RLM color standards with several original paint samples of both the light blue and gray violet paint found in protected areas of the He 219's fuselage. These samples were devoid of light and contaminants and provided the best possible references on which to base the color match mixed by Dave in-house. Dave then applied two coats of epoxy primer to the upper surfaces, immediately followed by three coats of acrylic urethane in RLM 75. This formed the background on which the camouflage pattern would later be applied. The next step was to apply two coats of epoxy primer and three coats of black acrylic urethane to the lower surfaces. Both gray violet and black topcoats were applied with the wing in its work fixture standing vertically and leading edge down. In this orientation, lower wing Balkenkreuz, stencils and hand-painted placards were rendered to the bottom surfaces of the wing.
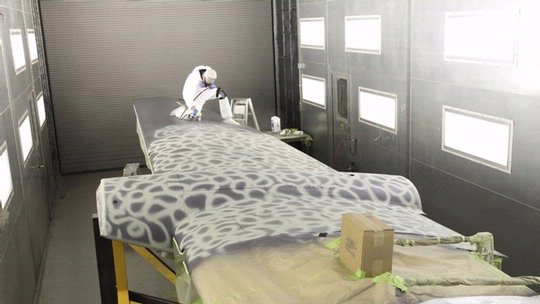 Dave Wilson during the application of the wave pattern. Photo: Jonathan R. Barrett
In late summer 2014, the massive wing—weighing about 2,200 kilograms (4,900 pounds)—was pulled outside of its hangar at the Paul E. Garber Preservation, Restoration, and Storage Facility and rotated from vertical to horizontal orientation in preparation for spraying the camouflage pattern to the upper surfaces. (See our blog post from August). After the rotation, the wing was returned to the facility’s paint booth, where temperature and lighting conditions during the storage and painting process could be carefully controlled. Dave began the painting process by first masking the restored nacelle areas and original painted surfaces of the flap wells. A special low tack masking tape was used over the original paint, as standard masking tape would have resulted in pulling off the fragile paint. Next, the parting line between the lower surfaces and upper surfaces was masked using another specialized masking tape, round in profile and made of foam. This tape is specifically designed to result in a “soft” edge rather than the hard tape line which normally is created by standard masking tape. Since Dave worked very carefully to preserve as much of the original paint as possible, the masking process alone took nearly two weeks to complete. Then, the aircraft was ready for the application of the "Wellenmuster" (wave pattern)—or as the restorers in-house call it, the “squiggle pattern.” Recreating this wave pattern was a fascinating process in itself.
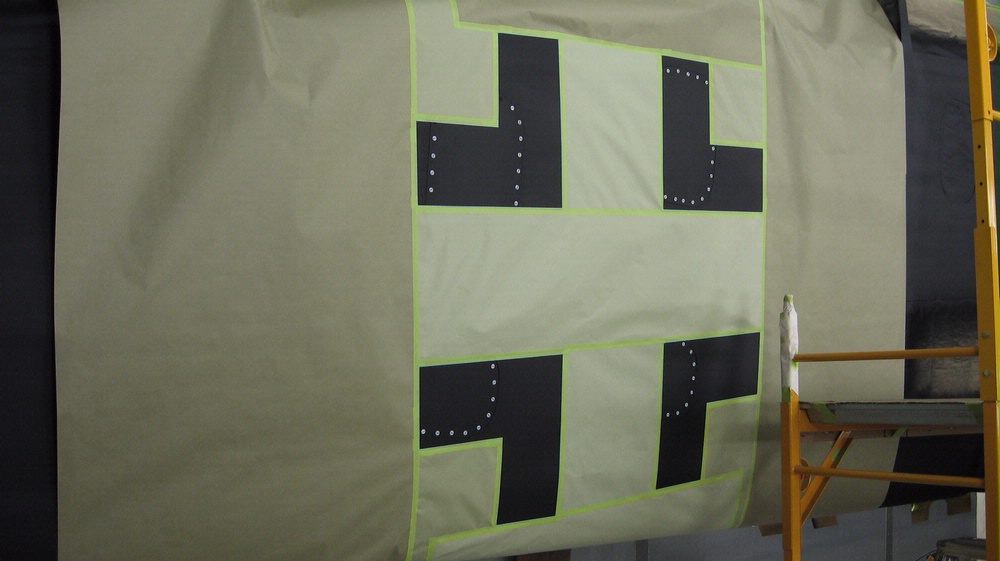 A closer look at the lower wing starboard Balkenkreuz, its shape laid out by masking tape. Photo: Dave Wilson
The original camouflage on the upper surfaces of the fuselage was intact, although badly degraded. Tracings were made of the patterns on sheets of clear Mylar and these patterns were transferred onto the freshly painted base coat of RLM 75 Gray Violet, creating a sort of “paint by numbers” guide to follow when the pattern was actually sprayed. By using this method, the camouflage pattern was duplicated as exact as possible to what was originally there. The wing, however, presented a different challenge. The paint on the upper surfaces of the wing was entirely eroded away with no trace of what the original pattern looked like. Unlike the camouflaging of the fuselage, there were no tracings to use as templates for the wing. It was decided the best course of action was to “free hand” the application of the “squiggles” approximating the pattern as best as possible. In preparation, several large sheets of plastic were rolled out over the floor of the paint booth, and the pattern was practice sprayed using surplus paint. While Dave got some practice painting the “squiggles” this way, it also allowed him to fine tune the spray gun adjustments and the viscosity of the paint. This way he was able to minimize the chance for runs or sags while applying the camouflage pattern. The spraying of the “squiggles” was quite tricky as it required a combination of standing and kneeling on the wing itself to reach those areas where the wing chord was too wide to be reached any other way. Dave started at the center of the wing root and moved toward the wing tip, away from those areas that he had just painted. The wave pattern was applied in two coats. This meant that only a limited surface area could be sprayed at one time before the second coat needed to be applied, otherwise, Dave would have been walking on surfaces he just sprayed. In all, it took about 12 hours (six hours per side) to complete the application of the wave pattern. Under the conditions of World War II, workers on the manufacturing sites or the field crews would have spent far less time on this task—however, they were not re-creating history, they were making it!
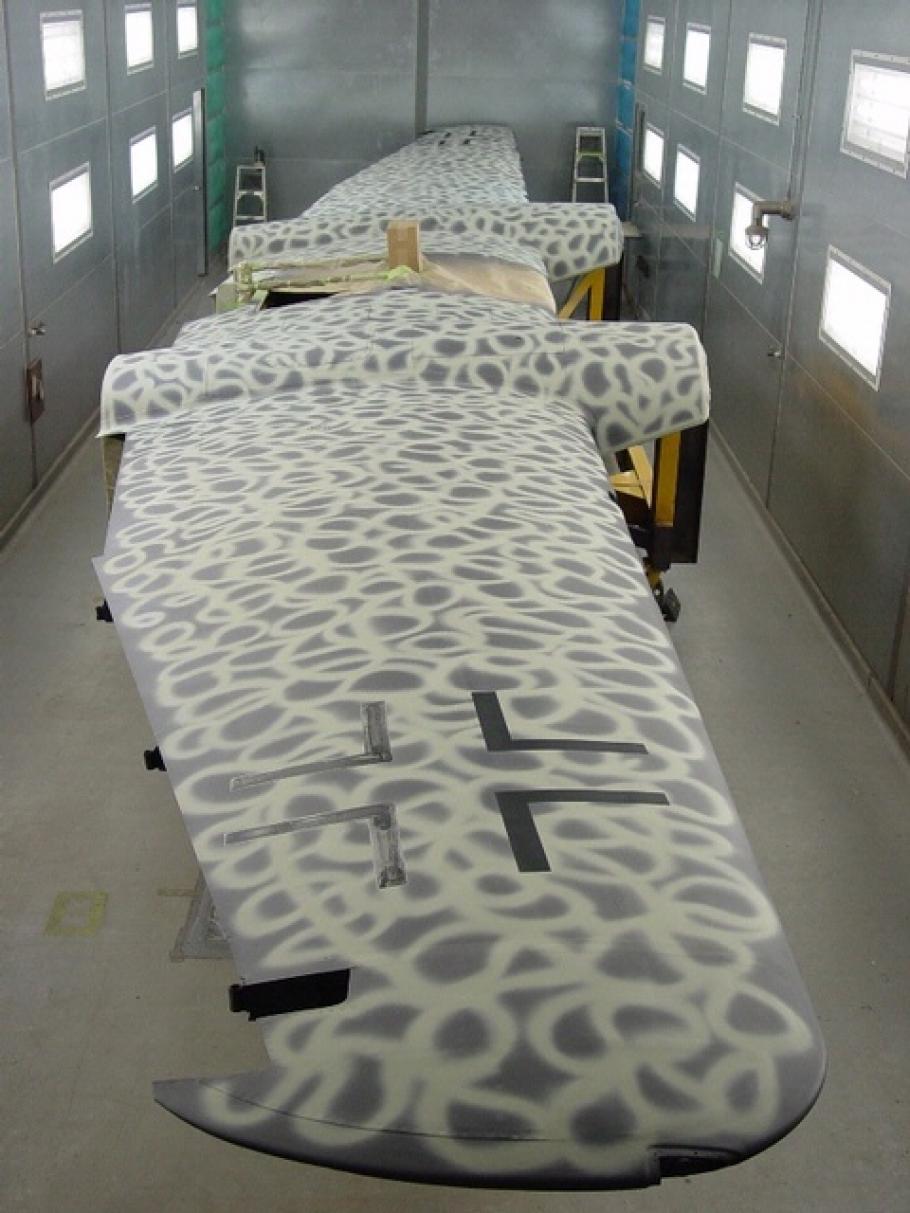
The finished He 219 wing, with the rearward half of the Balkenkreuz left untouched. Photo: Dave Wilson
The Balkenkreuz After images of the wing were published on this blog in August, quite a few readers commented on the location, shape, and dimensions of the Balkenkreuz, which does not match official RLM regulations. The Museum staff noticed this irregularity from the beginning and had to make a decision: Do we restore our He 219 according to regulation, as a generic type, or exactly as we found it, historically correct to our particular aircraft? We opted for the latter. However, position and dimension of the lower Balkenkreuz on the He 219 wing have been the subject of spirited debate. We can only theorize that the unsymmetrical and non-standard size and placement of the markings can be attributed to a number of factors including hurried working conditions, unskilled forced labor, and possibly even a disregard for official regulations during manufacturing. We also decided not to apply any paint to the rear half of the starboard upper Balkenkreuz so that it can be preserved in its original, 70-year-old condition. Its worn and faded original brushstrokes are clearly visible. For display purposes, the original Balkenkreuz will be covered with zero tack black vinyl. This will lend consistency to the appearance of the Balkenkreuz, yet allow easy access to the original paint for later research or analysis. It is believed the upper Balkenkreuz was factory sprayed, and then at some later date, at the unit level, re-touched using a brush. We can only speculate that this probably occurred at the time the undersurfaces were overpainted. The wing was transported to the Udvar-Hazy Center, and was on view during our recent Open House, but no date has been set for the final assembly of He 219. Before this can happen some major issues have to be resolved—among others, the installation of the He 219’s main landing gear and the reverse-engineering of the aircraft’s antennas, which were lost after the aircraft arrived in the U.S. Stay tuned for new updates!
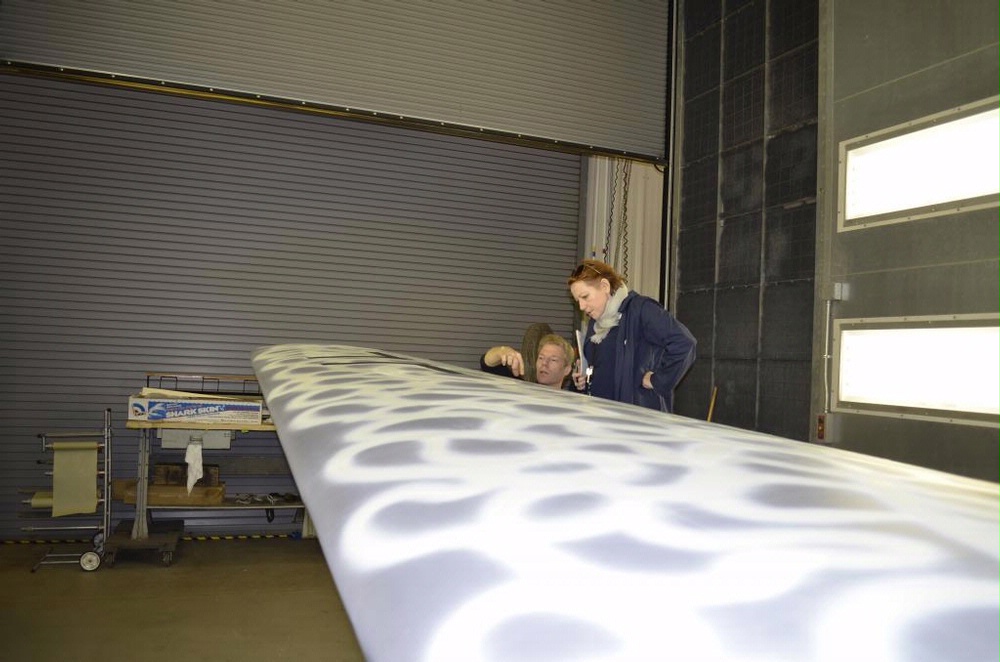 European aviation curator Evelyn Crellin and Museum specialist Dave Wilson discuss paint finish and upper starboard wing Balkenkreuz on the He 219. Photo: Rick Kranias
Evelyn Crellin is the curator for European aviation at the National Air and Space Museum. Dave Wilson is a museum specialist in the Museum’s Preservation & Restoration Unit at the Steven F. Udvar-Hazy Center. Rick Kranias is a research assistant to the He 219 Team.
We rely on the generous support of donors, sponsors, members, and other benefactors to share the history and impact of aviation and spaceflight, educate the public, and inspire future generations. With your help, we can continue to preserve and safeguard the world’s most comprehensive collection of artifacts representing the great achievements of flight and space exploration.
We rely on the generous support of donors, sponsors, members, and other benefactors to share the history and impact of aviation and spaceflight, educate the public, and inspire future generations. With your help, we can continue to preserve and safeguard the world’s most comprehensive collection of artifacts representing the great achievements of flight and space exploration.